
How to Choose Pots for Monstera: A 2026 Guide

Table of Contents
- Why Pot Choice Matters for Your Monstera
- Monstera Pot Size Guide: Getting the Dimensions Right
- Best Pot Material for Monstera: Comparing Your Options
- Drainage Requirements: Why Holes Matter
- How to Prevent Root Rot in Monstera: Choosing Wisely
- Signs Your Monstera Needs Repotting
- Repotting Your Monstera: Step-by-Step
- Avoiding Common Repotting Mistakes
Last Updated: August 11, 2026
Why Pot Choice Matters for Your Monstera
Choosing the right pot for your Monstera directly determines whether your plant thrives or struggles. The wrong pot leads to root rot, stunted growth, and an unhappy plant. The right one creates the perfect environment for healthy roots, proper drainage, and years of vibrant foliage.
A pot that's too large holds excess moisture around the roots. A pot that's too small restricts growth and creates root-bound conditions. The material you choose affects how quickly soil dries, how heavy the pot is, and how your plant looks in your space.
This guide breaks down everything you need to know to choose pots for Monstera with confidence, from sizing and materials to drainage requirements and repotting timing.
Monstera Pot Size Guide: Getting the Dimensions Right
The most common sizing mistake is choosing a pot too large. The ideal approach is to select a pot only slightly larger than the current one.
Ideal pot diameter and depth
For a healthy Monstera, the pot diameter should be 2.5-5 cm larger than the current pot's diameter. If your Monstera is in a 15 cm pot, move it to a 20 cm pot. This gives roots room to expand without excessive unused soil that stays wet too long.
Depth matters equally. Monsteras develop deep root systems, so choose a pot that's at least as deep as it is wide, ideally slightly deeper. A pot that's 25 cm wide should be 25-30 cm deep. This prevents water pooling at the bottom and allows roots to grow downward naturally.
For mature Monsteras with aerial roots and moss poles, deeper pots provide stability. A top-heavy plant in a shallow pot becomes a tipping hazard, especially on shelves or side tables.
Pot shape: wide versus deep
Wide, shallow pots suit younger Monsteras in early growth stages. They dry faster and reduce overwatering risk for beginners. As your plant matures, a taller, narrower pot becomes more practical.
Deep pots work better for established plants because they accommodate the plant's natural growth trajectory and provide stability for aerial roots to climb a moss pole. If you're planning to add a moss pole, a deeper pot anchors it securely and prevents instability.
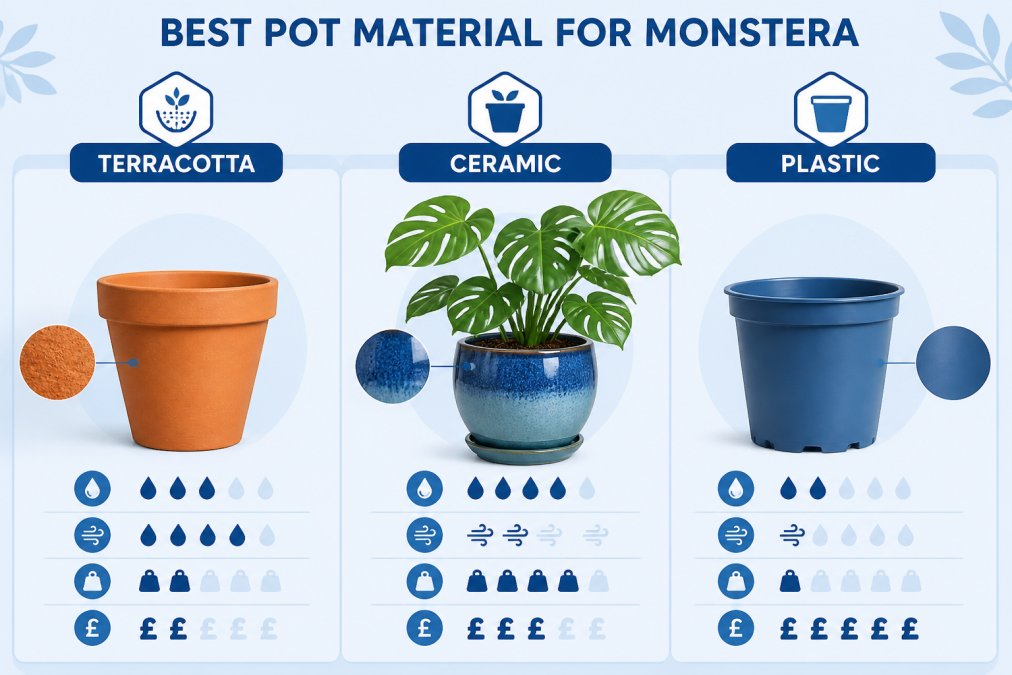
Best Pot Material for Monstera: Comparing Your Options
The material you choose affects drainage, moisture retention, temperature regulation, and aesthetics.
Terracotta pots: breathability and weight
Terracotta is porous and breathes beautifully, allowing soil to dry faster than any other material. This makes it ideal for plant parents who tend to overwater or live in humid climates. Water evaporates through the pot sides as well as the drainage hole, reducing root rot risk significantly.
However, terracotta is heavy; a 25 cm terracotta pot can weigh 3-4 kg when filled with soil. For a large Monstera with aerial roots and a moss pole, that weight is beneficial for stability. But if you're moving the pot frequently or placing it on a shelf, the heft becomes a drawback.
Terracotta also dries soil faster than most people expect. In warm weather or heated homes, you may need to water every 4-5 days instead of weekly, requiring more attention.
Plastic pots: lightweight and moisture-retentive
Plastic pots are affordable, lightweight, and retain moisture longer than terracotta, useful if you tend to underwater or live in dry climates. They're also durable and don't break if dropped.
The downside is that plastic doesn't breathe. Soil stays wet longer, increasing root rot risk if you're not careful with watering frequency. Plastic also degrades under direct sunlight and becomes brittle over time.
For Monstera care, plastic nursery pots work well as functional containers inside decorative cachepots. This two-pot approach gives you the moisture control of plastic with the aesthetic appeal of a prettier outer pot.
Ceramic pots: style with considerations
Ceramic pots offer beautiful designs and feel more permanent than plastic. However, ceramic is typically glazed, which reduces breathability compared to terracotta. The glaze also makes ceramic heavier than plastic but lighter than unglazed terracotta.
Drainage depends entirely on whether the ceramic pot has drainage holes. Many decorative ceramic pots don't, which means you must use them as cachepots rather than direct planting containers. If you love a ceramic pot without drainage, place your Monstera in a plastic nursery pot inside it.
Ceramic can be fragile. Unlike plastic, it cracks or shatters if dropped, a real consideration if you have children or pets.
Sustainable materials: eco-friendly alternatives
Eco-conscious plant parents increasingly choose pots made from bamboo fibre, recycled plastic, or biodegradable materials. Bamboo fibre pots are lightweight, durable, and naturally antibacterial. They breathe better than plastic but not as much as terracotta. Recycled plastic pots perform similarly to virgin plastic but with a smaller carbon footprint.
When choosing sustainable options, verify that the pot has adequate drainage holes.
Drainage Requirements: Why Holes Matter
Drainage holes are non-negotiable for Monstera health. A pot without drainage holes will eventually kill your plant. Water with nowhere to escape accumulates around roots, creating anaerobic conditions that cause root rot within weeks.
Every pot you use for direct planting must have at least one drainage hole, ideally 2-3 for pots larger than 20 cm. Aim for holes at least 1.25 cm in diameter to ensure water drains quickly.
Place a saucer or tray under the pot to catch excess water, but never let the pot sit in standing water. Empty the saucer 15-20 minutes after watering.
How to Prevent Root Rot in Monstera: Choosing Wisely
Root rot is the leading cause of Monstera death, and pot choice is your first line of defence. A pot with poor drainage, inadequate aeration, or excessive moisture retention creates the perfect environment for root rot.
Prevention starts with material selection. Terracotta and unglazed ceramic breathe better than plastic and glazed ceramic. If you're prone to overwatering, choose terracotta.
Soil compaction also contributes to root rot. When repotting, use fresh substrate with good drainage. Add perlite or orchid bark to standard potting mix to improve aeration, especially important in plastic pots.
Finally, pot size directly affects root rot risk. An oversized pot holds water longer, giving roots more time to sit in moisture. Stick to the 2.5-5 cm rule: only move up one pot size at a time.
Signs Your Monstera Needs Repotting
Knowing when to repot prevents root-bound conditions while avoiding unnecessary stress. Most Monsteras need repotting every 12-18 months during the growing season.
Root-bound indicators
When roots have nowhere to grow, they circle the pot, forming a dense mat around the soil perimeter. If you see roots emerging from drainage holes or spiralling at the soil surface, your Monstera is root-bound. Gently tip the pot sideways and peek at the root system; if roots fill the entire pot with little soil visible, it's time to repot.
A root-bound plant grows slower, even with proper watering and light. If your Monstera suddenly slows its growth despite healthy conditions, root-boundedness is often the cause.
Growth rate and timing
Monsteras grow fastest in spring and summer, so this is the ideal repotting window. Repotting in autumn or winter stresses the plant because it's entering dormancy. If your Monstera needs repotting, do it between March and August for best results.
Young Monsteras often need repotting annually because they're growing rapidly. Mature plants may only need repotting every 18-24 months. Once your Monstera reaches full size, you might repot only every 2-3 years, refreshing the top few centimetres of soil annually instead.
Repotting Your Monstera: Step-by-Step
Repotting is straightforward if you follow a logical sequence. Proper technique minimises transplant shock and ensures your plant settles quickly.
Preparing your new pot and substrate
Choose a pot 2.5-5 cm larger in diameter than the current one, with drainage holes. Fill the bottom with fresh substrate; a mix of standard potting soil, perlite, and orchid bark works well. The perlite improves aeration, and orchid bark adds structure to prevent soil compaction.
Add substrate until the pot is about one-third full. The soil level should allow the Monstera's base to sit at the same height as before; burying the stem deeper can cause rot.
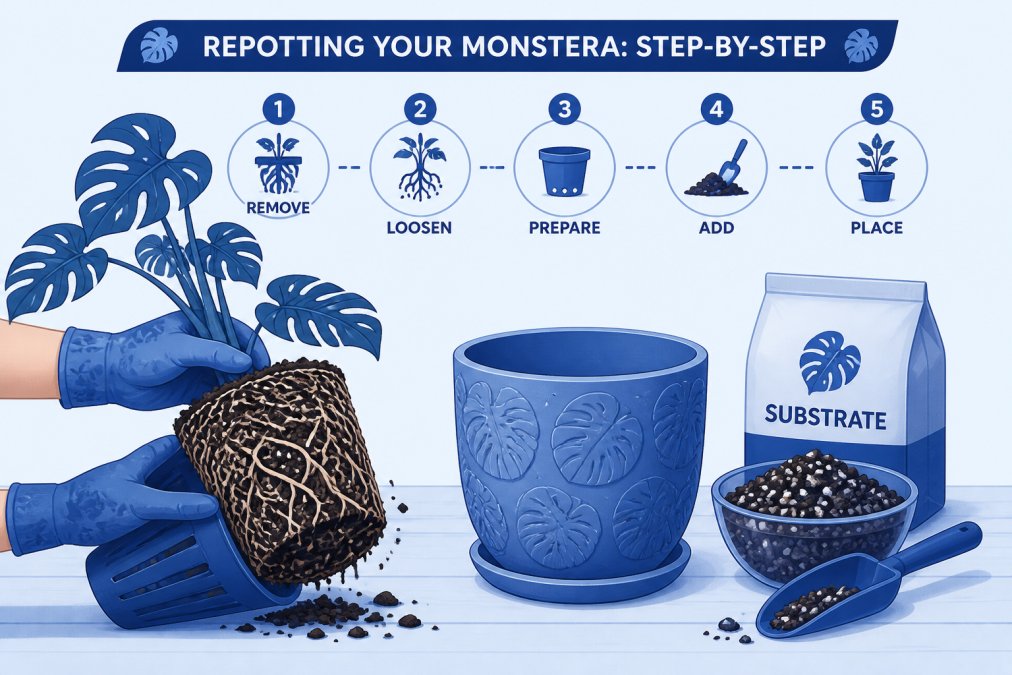
Removing and transplanting your plant
Water your Monstera 1-2 hours before repotting. Moist soil loosens from the pot sides more easily and reduces root damage. Gently tip the pot sideways and slide the plant out, supporting the base with your other hand.
Once the root ball is free, loosen the roots gently with your fingers. If roots are tightly wound, carefully tease them apart to encourage outward growth into the new soil rather than continuing their circular pattern.
Place the root ball in the new pot and fill around the sides with fresh substrate. Press gently to eliminate air pockets, but don't compress the soil hard.
Aftercare and avoiding transplant shock
Water thoroughly after repotting until water drains from the bottom. Then don't water again for 5-7 days; the fresh substrate is already moist, and roots need a brief adjustment period.
Place the repotted Monstera in bright, indirect light for 1-2 weeks. Avoid direct sun and cold draughts. The plant may look slightly droopy for a few days; this is normal transplant shock.
Hold off on fertilising for 4-6 weeks after repotting. The fresh substrate contains nutrients, and fertilising too soon can burn tender new roots.
Avoiding Common Repotting Mistakes
Choosing a pot too large is the biggest mistake. Many people think "bigger pot = more room to grow," but oversized pots trap moisture and create root rot risk. Stick to the 2.5-5 cm rule.
Using old, compacted substrate is another frequent error. Reusing old soil introduces pest eggs, disease spores, and compacted particles that restrict drainage. Always use fresh substrate when repotting.
Repotting at the wrong time stresses your plant unnecessarily. Spring and summer repotting aligns with the plant's natural growth cycle, allowing faster recovery.
Burying the stem too deep causes rot at the base. The Monstera's base should sit at the same soil level as before.
Finally, watering immediately after repotting and then again too soon creates waterlogged conditions. Fresh substrate is already moist from initial watering. Waiting 5-7 days before the next watering gives roots time to adjust.
Choosing the right pot for your Monstera sets the foundation for years of healthy growth. The right pot size, material, and drainage system work together to create conditions where your plant thrives. If you're looking for pots that combine function with personality, Quirky Turkey Gifts offers a curated selection of charming plant pots designed to bring joy to your space while keeping your Monstera happy. With over 100,000 satisfied customers and super-fast delivery, we're here to help you find the perfect home for your green companion. Explore our collection today and discover pots that make plant care easier and more enjoyable.
Frequently Asked Questions
Do Monsteras prefer deep or wide pots?
Monsteras develop expansive root systems and prefer wide pots over deep ones. A pot that's slightly wider than the root ball encourages lateral root growth and better aeration. Aim for a pot diameter 2-5 centimetres larger than the previous one when repotting. Depth matters less than width, as Monstera roots spread outward rather than downward.
How do I know if my Monstera needs a bigger pot?
Your Monstera is root-bound when roots circle the soil surface, emerge from drainage holes, or the plant dries out quickly after watering. Stunted growth, yellowing leaves, and soil that pulls away from the pot edges are also signs. Check the root system by gently removing the plant; if roots are tightly packed and wrap around the soil ball, it's time to repot into a larger container.
What substrate should I use with my new Monstera pot?
Use a well-draining substrate that combines regular potting soil with perlite or orchid bark in a 2:1 ratio. This prevents soil compaction and ensures water drains properly, reducing root rot risk. Avoid heavy garden soil or standard potting mixes alone, as they retain too much moisture. Adding aeration materials like perlite keeps the root system healthy and supports aerial roots if your Monstera develops them.
Will my Monstera go into shock after repotting?
Transplant shock is common but temporary if you handle repotting carefully. Minimise root disturbance, use the same watering schedule, and avoid fertilising for 4-6 weeks after repotting. Keep your Monstera in indirect light and maintain consistent temperature. Most plants recover within 1-2 weeks. Signs of shock include drooping leaves or temporary growth pause; this is normal and typically resolves without intervention.
This article was written using GrandRanker