
What Size Pot for Large Monstera: A Guide

Table of Contents
- Understanding Pot Size for Large Monstera Plants
- Recognising Monstera Root Bound Signs
- Choosing Between Pot Materials
- Best Soil for Monstera and Drainage Setup
- Step-by-Step Repotting Process
- Stability and Weight Considerations for Large Specimens
- Common Mistakes to Avoid When Repotting
- Frequently Asked Questions
Last Updated: September 3, 2026
Understanding Pot Size for Large Monstera Plants
When your Monstera grows into a sprawling indoor giant, choosing the right pot becomes essential. The pot you select determines whether its root system thrives or suffocates. A pot that's too small restricts growth and creates moisture problems. A pot that's too large invites root rot. What size pot for large monstera plants depends on the current root system's maturity, the plant's height and weight, and the pot material you choose. This guide walks you through every consideration, from measuring your plant's root ball to understanding why depth matters as much as diameter.
The 2.5-5 cm Rule Explained
The most common advice is the "2.5-5 cm rule": move your plant to a pot that's 2.5-5 cm larger in diameter than its current container. A modest increase gives roots room to expand without overwhelming the soil with excess moisture that the plant can't absorb.
For large Monstera specimens, this rule still applies. A mature Monstera with a substantial root system might need 5-7.5 cm of additional diameter if it's been in the same pot for several years. Check whether your plant is actually root-bound first. A severely root-bound plant, with roots circling the entire pot and breaking through drainage holes, can handle a slightly larger jump than one that's only moderately root-bound.
The rule works because it maintains a healthy balance between root growth and soil moisture. Too much empty soil stays wet longer, creating conditions where root rot thrives. Too little soil restricts the root system's expansion. That narrow sweet spot keeps both problems at bay.
Diameter vs Depth: What Actually Matters
Most guides focus entirely on pot diameter and ignore depth. For a large Monstera, depth is equally important.
Monstera roots grow both outward and downward. A pot that's wide but shallow forces roots into a compressed horizontal layer, limiting their ability to establish a strong foundation. This is especially problematic for large specimens that develop heavy foliage and become top-heavy.
For large Monsteras, aim for a pot where the depth is at least equal to the diameter, ideally slightly deeper. A 25 cm-diameter pot should be at least 25 cm deep, preferably 28-30 cm. This depth gives roots vertical space to grow downward and lowers the plant's centre of gravity, improving stability. The potting mix also settles over time, and a deeper pot accounts for this natural compaction, ensuring roots don't end up too close to the surface.
Recognising Monstera Root Bound Signs
Before you repot, confirm that your Monstera actually needs a larger pot. Not every plant that's been in the same container for a year needs repotting. Repotting unnecessarily stresses the plant and can trigger transplant shock.
Visual Diagnostic Guide
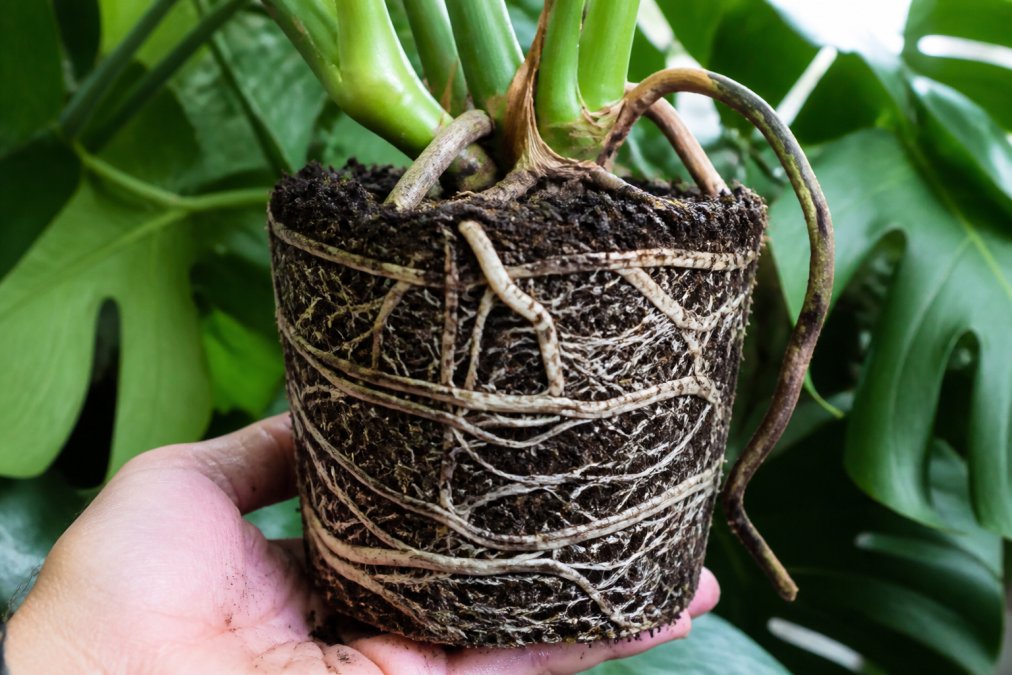
A root-bound Monstera displays several unmistakable signs. Roots pushing through drainage holes or circling visibly around the pot's base indicate your plant has outgrown its home. Roots breaking through the top of the potting mix, especially thick aerial roots, indicate the root system is cramped.
Water behaviour changes noticeably. Water runs straight through the pot without absorbing into the soil, or it sits on the surface and takes an unusually long time to drain. The plant may also dry out faster than usual, even with regular watering.
Growth rate slows dramatically. A Monstera that's been putting out new leaves every few weeks suddenly stops. New growth becomes smaller, and leaf colour may fade. Lift the pot, a root-bound Monstera feels surprisingly heavy because the entire interior is packed with roots.
Choosing Between Pot Materials
The material you choose affects how moisture moves through the soil and how stable your pot is with a large plant.
Terracotta vs Plastic Nursery Pots
Terracotta is porous. Water evaporates through the pot walls, making it harder to overwater and easier for roots to access oxygen. It's also heavy, providing excellent stability for tall, top-heavy Monsteras.
The downsides are significant. Terracotta is fragile and breaks easily. It's also heavy, a large terracotta pot filled with moist soil can weigh 15-20 kg, making it difficult to move. Terracotta pots also dry out quickly, meaning you'll water more frequently.
Plastic nursery pots retain moisture longer because they're non-porous. This is ideal for forgetful waterers or those in dry environments. They're lightweight and durable.
The trade-off is that plastic retains water too well if you're not careful. It's easier to overwater in plastic, especially if drainage holes are small. Plastic also provides less stability for large plants.
For a large Monstera, the choice depends on your watering habits and home environment. Many experienced growers use plastic nursery pots inside decorative ceramic or terracotta containers, combining the benefits of both.
Ceramic and Aesthetic Plant Pots for Indoor Plants
Ceramic pots split the difference between terracotta and plastic. They're less porous than terracotta but more so than plastic, offering moderate breathability. They're lighter than terracotta but heavier than plastic, providing better stability. Ceramic is also more durable than terracotta.
Ceramic pots come in endless colours, patterns, and finishes, making them ideal if you want your Monstera to complement your décor. Quirky Turkey Gifts offers options like The Green Goddess Plant Pot, which combines elegant garden aesthetics with the functionality you need for a thriving plant.

When selecting ceramic for a large Monstera, check the weight and wall thickness. Thicker ceramic provides better insulation and stability. Ensure the pot has adequate drainage holes, some decorative ceramic pots have tiny or insufficient drainage, which is problematic for large plants.
Best Soil for Monstera and Drainage Setup
Large Monsteras need a potting mix that balances moisture retention with aeration. A dense, heavy soil causes root rot. A soil that's too light dries out too quickly.
A good Monstera potting mix combines peat moss or coco coir for moisture retention, perlite for aeration, and orchid bark for structure. A typical ratio is 2 parts peat moss, 1 part perlite, and 1 part orchid bark. Some growers add a small amount of worm castings for nutrients.
Drainage holes are non-negotiable. A pot without proper drainage is a root rot waiting to happen. For a large Monstera, you need at least two drainage holes, preferably three or more. If your chosen pot has only one small hole, drill additional ones or select a different pot.
Place a layer of broken terracotta shards or pebbles at the pot's base. This prevents soil from washing out through drainage holes while maintaining airflow. Add your potting mix, then gently place the Monstera's root ball in the centre. Fill around the roots with fresh mix, pressing gently to eliminate air pockets. The soil surface should be level with the top of the root ball, not higher, which can cause stem rot, and not lower, which leaves roots exposed.
Step-by-Step Repotting Process
Repotting a large Monstera is straightforward if you follow a systematic approach. The process takes 20-30 minutes for most plants.
What You'll Need Before You Start
Gather your materials before you begin: your new pot with drainage holes, fresh potting mix, a watering can, newspaper or a tarp to contain spilled soil, and pruning shears for trimming dead or damaged roots. For large Monsteras, having a second person helps, as these plants can be awkward to manoeuvre.
Repotting Your Large Monstera
Water your Monstera thoroughly 24 hours before repotting. Moist soil clings to roots and reduces transplant shock. Gently tip the pot on its side and slide the plant out. If it's stuck, run a knife around the inside edge of the pot to loosen it. Never yank the plant by its stem.
Once the root ball is free, examine the roots. Healthy roots are white or light tan and firm. Dark, mushy roots indicate rot and should be trimmed away with clean shears. Gently loosen the outer roots with your fingers, especially if they're circling tightly.
Place a layer of fresh potting mix in the bottom of your new pot. Position the Monstera so the top of its root ball sits about 2 cm below the pot's rim. Fill around the root ball with fresh mix, pressing gently. Avoid compacting the soil too firmly, which restricts aeration.
Water thoroughly until water drains from the bottom. This settles the soil and eliminates air pockets. Place the repotted plant in bright, indirect light for a week. Resume normal watering after one week, but err on the side of underwatering for the first month as the plant recovers.
Stability and Weight Considerations for Large Specimens
A mature Monstera with multiple vines and dense foliage becomes genuinely heavy. The plant itself might weigh 5-10 kg, and adding a large pot with soil pushes the total weight to 15-25 kg. This weight requires a stable base.
Terracotta pots provide inherent stability through sheer mass. Plastic pots are so light that a large, top-heavy Monstera can easily topple. If you're using a plastic pot, consider placing it inside a heavier ceramic or terracotta cache pot for stability.
Pot shape matters. A pot with a wider base is more stable than one with a narrow base. Look for pots that taper slightly, wider at the bottom, narrower at the top. This shape lowers the centre of gravity and prevents tipping.
Common Mistakes to Avoid When Repotting
The most common error is choosing a pot that's too large. Jumping from a 15 cm pot to a 25 cm pot in one go creates excess soil that stays wet too long, leading to root rot. Stick to the 2.5-5 cm rule, even for large plants.
Another frequent mistake is using regular potting soil instead of a well-draining mix. Standard potting soil compacts over time and retains too much moisture for Monsteras. Always use a mix designed for aroids or make your own with peat moss, perlite, and bark.
Overpacking the soil is also problematic. Pressing soil too firmly around the roots restricts oxygen and makes the substrate less permeable to water. Gently fill around roots, pressing just enough to eliminate large air pockets.
Repotting at the wrong time stresses the plant unnecessarily. The best time to repot is during the growing season, spring through early summer. Repotting in autumn or winter extends recovery time and increases transplant shock.
Finally, avoid watering immediately after repotting. Water the plant thoroughly during repotting to settle the soil, but then hold back on watering for a few days. The fresh potting mix is already moist, and the roots are stressed.
Choosing the right pot size for a large Monstera means balancing growth potential with root health. A pot that's 2.5-5 cm larger in diameter, with adequate depth and proper drainage, gives your plant the space to thrive without inviting root rot. Whether you choose terracotta, plastic, or ceramic depends on your watering style and décor preferences. At Quirky Turkey Gifts, we offer beautiful ceramic options like The Green Goddess Plant Pot that combine stunning aesthetics with the functionality your large Monstera deserves. Pair your new pot with well-draining potting mix, follow the step-by-step repotting process, and your plant will reward you with vigorous new growth and a healthier root system.
Frequently Asked Questions
Q: Do Monsteras like deep pots or wide pots?
A: Large Monsteras benefit from pots that are slightly deeper than they are wide. While width supports the root system's horizontal spread, depth accommodates the plant's mature root ball and provides stability for top-heavy specimens. A pot that's 1-2 cm deeper than its diameter works well for most large Monsteras. However, avoid excessively deep pots, which can lead to moisture retention and root rot in the lower layers of soil.
Q: How do I tell if my Monstera needs a bigger pot?
A: Watch for these signs your Monstera is root-bound: roots circling the soil surface or protruding from drainage holes, slower growth despite good care, water running straight through without absorption, and the plant becoming top-heavy or unstable. If you see aerial roots emerging more frequently, that's another indicator. Check the root ball by gently removing the plant; if roots form a dense mat around the edges, repotting time has arrived.
Q: Should I use a terracotta or plastic pot for a large Monstera?
A: Terracotta offers excellent aeration and prevents overwatering, but it's heavy and can crack with large specimens. Plastic nursery pots are lightweight, affordable, and retain moisture longer, making them ideal for large Monsteras. For aesthetic display, ceramic pots work beautifully but must have drainage holes. Many plant enthusiasts use a plastic nursery pot inside a decorative ceramic or terracotta pot to balance function with style.
Q: What's the best soil for Monstera repotting?
A: Use a well-draining potting mix combining peat moss, perlite, and orchid bark in roughly equal parts. This substrate prevents stagnant water while retaining enough moisture for healthy growth. Add extra perlite if your mix feels too dense. Avoid standard multipurpose compost, which compacts and reduces oxygen exchange around the root system. A quality potting mix ensures proper aeration and reduces transplant shock after repotting.
This article was written using GrandRanker


